This PLC application about how to use Nikon Digital Camera for connecting to PLC with using Raspberry Pi 2. this application for photographing, example:
Automatically take picture when:
In Raspberry Pi using Raspberry pi 2 with Raspbian Wheezy OS and use python 2.7
In PLC using Siemens S7-200 with Modbus Support or another PLC with Modbus Support.
sudo cp /boot/cmdline.txt /boot/cmdline.bak
sudo cp /etc/inittab /etc/inittab.bak
sudo nano /boot/cmdline.txt
Remove "console=ttyAMA0,115200"
Ctrl+X to exit, Y to save followed by enter twice
Automatically take picture when:
- products that are not good (NG) or reject
- at a certain time, the worker does not exist in the machine
- emergency stop in the machine, and etc.
In Raspberry Pi using Raspberry pi 2 with Raspbian Wheezy OS and use python 2.7
In PLC using Siemens S7-200 with Modbus Support or another PLC with Modbus Support.
Hardware needed for Digital Camera Application
- Digital Camera with PTP Support, I use Nikon COOLPIX S2800 Compact Digital Camera
- Raspberry Pi 2
- PLC that is Modbus Support, I use Siemens PLC S7-200
- Male RS232 - TTL Module
- RS232 PLC Cable
- Power Supply for Raspberry Pi
- 2 pieces Push Button Switch for test

Hardware Connection for Digital Camera Application
Software needed for Digital Camera Application
- Raspbian Wheezy OS : https://www.raspberrypi.org/downloads/raspbian/
- gphoto2 reference : http://gphoto.sourceforge.net/doc/manual/ref-gphoto2-cli.html
- Project file for Raspberry Pi Setup, click here
Raspberry Pi Setup for Digital Camera Application
A. Serial Modbus Setup on Raspberry Pi 2
STEP 1:
In LXTerminal:sudo cp /boot/cmdline.txt /boot/cmdline.bak
sudo cp /etc/inittab /etc/inittab.bak
sudo nano /boot/cmdline.txt
Remove "console=ttyAMA0,115200"
Ctrl+X to exit, Y to save followed by enter twice
sudo nano /etc/inittab
Put a '#' before "T0:23:respawn:/sbin/getty -L ttyAMA0 115200 vt100
Ctrl+X to exit, Y to save followed by enter twice
Put a '#' before "T0:23:respawn:/sbin/getty -L ttyAMA0 115200 vt100
Ctrl+X to exit, Y to save followed by enter twice
STEP 2:
Copy Paste All Project file to folder /home/pi on Raspberry Pi 2
STEP 3:
In LXTerminal
cd /home/pi
cd pyserial-2.7
sudo python setup.py install
cd /home/pi
cd pyserial-2.7
sudo python setup.py install
STEP 4:
In LXTerminal
cd /home/pi
cd MinimalModbus-0.6
sudo python setup.py install
cd /home/pi
cd MinimalModbus-0.6
sudo python setup.py install
B. gphoto2 Setup on Raspberry Pi 2
STEP 1:
Raspberry Pi Connected to Internet via Ethernet/LAN
Install via Internet Access:
Open LX-Terminal and type:
cd ~
sudo apt-get install libltdl-dev libusb-dev libusb-1.0 libexif-dev libpopt-dev
Optional: Raspberry Pi Disconnected from Internet
Install via Internet Access:
Open LX-Terminal and type:
cd ~
sudo apt-get install libltdl-dev libusb-dev libusb-1.0 libexif-dev libpopt-dev
Optional: Raspberry Pi Disconnected from Internet
STEP 2:
Camera do not Connected to Raspberry Pi
Already Project file to folder /home/pi on Raspberry Pi 2
Already Project file to folder /home/pi on Raspberry Pi 2
STEP 3: libgphoto2-2.5.8 setup
in LX-Terminal and type:
cd ~
cd libgphoto2-2.5.8
sudo chmod 777 * -R
./configure
sudo make install
cd ~
cd libgphoto2-2.5.8
sudo chmod 777 * -R
./configure
sudo make install
STEP 4: gphoto2-2.5.8 setup
in LX-Terminal and type:
cd ~
cd gphoto2-2.5.8
sudo chmod 777 * -R
./configure
sudo make install
cd ~
cd gphoto2-2.5.8
sudo chmod 777 * -R
./configure
sudo make install
STEP 5: Check the installed gphoto2 is Success
in LX Terminal type:
cd ~
gphoto2 --version
If Error:
gphoto2: error while loading shared libraries: libgphoto2.so.6: cannot open shared object file: No such file or directory
in LX Terminal type:
sudo ln -s /usr/local/lib/libgphoto2.so.6 /usr/lib/libgphoto2.so.6
If Error:
gphoto2: error while loading shared libraries: libgphoto2_port.so.12: cannot open shared object file: No such file or directory
in LX Terminal type:
sudo ln -s /usr/local/lib/libgphoto2_port.so.12 /usr/lib/libgphoto2_port.so.12
STEP 6: Camera Check
Camera Connected to Raspberry Pi via USB
in LX Terminal type:
cd ~
gphoto2 --auto-detect
gphoto2 --summary
in LX Terminal type:
cd ~
gphoto2 --auto-detect
gphoto2 --summary
If Error:
Camera already ..
From Remove Camera such as Storage Mass
sudo killall gvfs-gphoto2-volume-monitor
sudo chmod -x /usr/lib/gvfs/gvfs-gphoto2-volume-monitor
Camera already ..
From Remove Camera such as Storage Mass
sudo killall gvfs-gphoto2-volume-monitor
sudo chmod -x /usr/lib/gvfs/gvfs-gphoto2-volume-monitor
C. Auto Startup Python Script on Raspberry Pi 2
STEP 1:
in LX Terminal type:
cd ~
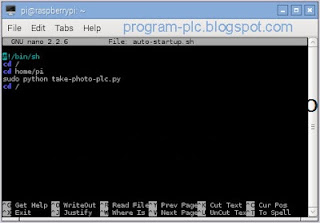
sudo nano auto-startup.sh
in editor, type in this script:
#!/bin/sh
cd /
cd home/pi
sudo python take-photo-plc.py
cd /
cd ~
sudo nano auto-startup.sh
in editor, type in this script:
#!/bin/sh
cd /
cd home/pi
sudo python take-photo-plc.py
cd /
and then:
CTRL+X , press Y, enter
CTRL+X , press Y, enter
STEP 2:
in LX Terminal type:
cd ~
sudo chmod 755 auto-startup.sh
cd ~
sudo chmod 755 auto-startup.sh
STEP 3:
Script Test, in LX Terminal type:
sudo sh auto-startup.sh
CTRL+C for Stop
sudo sh auto-startup.sh
CTRL+C for Stop
STEP 4:
in LX Terminal type:
sudo crontab -e
In editor, go to bottom and type:
@reboot sh /home/pi/auto-startup.sh >/home/pi/startuplog 2>&1
sudo crontab -e
In editor, go to bottom and type:
@reboot sh /home/pi/auto-startup.sh >/home/pi/startuplog 2>&1
CTRL+X , press Y, enter
STEP 5:
Auto Start the Desktop (LXDE)
- in LX Terminal type: sudo raspi-config
- 2.Select Enable Boot to Desktop/Scratch from the menu and press Enter
- 3.Select Desktop Login as user pi at the Graphical Desktop.
- 4.Select <Finish> and Enter, then select <Yes> to reboot.
PLC Programming for Automatic Capture Image
- Project file for Siemens PLC S7-200, click here
- Download PLC Ladder Programming to PLC using PLC Software


No comments:
Post a Comment